Overview
This KB article outlines the steps required to migrate a personal share into OneDrive from traditional file server environments. While it is targeted specifically to staff in ITS-supported organizations, the concepts can be generalized to anyone who has a personal share and would like to migrate it to OneDrive.
This article will walk you through how to:
- Access your personal share (if one exists)
- Migrate those files/folders into OneDrive in Windows and MacOS
- How to submit a Case for assistance if you cannot self-migrate
Critical Concepts
"Personal share"? What's that?
Personal shares are known by many different names. Some examples:
- Advancement: G: drive
- Business and Finance: K: drive
- Human Resources: H: drive
- Offices of the Chancellor's Complex, the Executive Vice Chancellor, and VC units: K: drive
- Resource Management and Planning: Lots of letters
Why use OneDrive over the personal share?
- OneDrive provides the same functionality as the personal share: a private work area that is secured remotely
- This can provide a level of disaster recovery and can enable work anywhere with public internet access
- Every staff and faculty member at the university is provisioned for OneDrive – share with anyone!
- Self-service: Moving, renaming, and changing permissions has been streamlined for users
- Plenty of storage space – with some caveats
- OneDrive is our recommended platform to replace the old personal shares, but you may also use Google Drive if you prefer
Key features of OneDrive
- Sharing with others
- By default, only you can see the content in your personal OneDrive
- You can create and share files and folders with any staff or faculty member at UCSD
- You can share files and folders with people outside of UCSD who have an Office 365 account
- You can customize permissions for any file/folder in your personal OneDrive as you see fit
- Folders and content management
- Streamlined folder changes: create, move, rename, and change permissions yourself without IT
- Moved files and folders will automatically inherit the permissions of the parent folder
- You can then customize the permissions again after the move
- You can access OneDrive without needing to be connected to the VPN
- Identity check is provided via Duo
- You can create and edit Microsoft Office files from your browser without needing to install the software
- Plenty of storage for most work use cases – this is not for non-work storage!
Steps to Take
Tips before you migrate
- If you do not recall ever using a personal share or any of the specific names mentioned above, it is possible you were never provisioned one or never needed to use it and this article will not apply to you.
- If you are using your personal OneDrive or Google Drive already, continue using it. Otherwise...
- If possible, we highly recommend starting the migration after work or on the weekend so that your own work is not interrupted
- The more individual files and folders you have, the longer the migration will take
- To assess the total size and number of files/folders, right-click an empty space in your personal share and select “Properties”. This scan may take upwards of several minutes depending on how much stuff you have stored in your personal share
- You can do this for any individual folder in your personal share
- Migration time estimates are provided below based on our own internal testing at home while connected to the VPN. Times may vary depending on the quality of your own home network and internet connection:
- 166 MB and total 299 files/folders took ~3 seconds
- ~2.5 GB and total ~5,700 files/folders took ~45 minutes
- ~8.5 GB and total 139 files/folders took ~55 minutes
- ~10 GB and total ~33,000 files/folders failed
- If you have a lot of stuff, it can help to migrate them in groups to ensure they migrate successfully
- If you have more than 3GB of total data and/or greater than 10,000 files/folders, we will reach out to you directly to offer assistance
- If you have been using your personal share to store backups of desktop files between computer migrations, we do not recommend migrating those into OneDrive as it will add additional migration time
- If you have a lot of stuff, try to move only what you need
- If you’re not sure what you need, take some time to narrow down what is important
- Some common office file types require a special migration process. Please submit a Case using this form as soon as possible if you actively use any of the following in your personal share:
- Outlook mail archives (.pst /.ost)
- OneNote 2016 and earlier notebooks (.one)
- Access databases (.accdb)
Pre-check steps
- If you are using a laptop, plug in the power adapter and verify it is charging
- If possible, make sure any screen timeout or sleep settings are disabled for the duration of the migration to ensure an uninterrupted session. You can turn these back on after your migration is complete
- Windows: Search for “Power & Sleep Settings” and disable all screen turn off/sleep options
- MacOS: Open System Preferences, click on Energy Saver, set “Computer Sleep” and “Display Sleep” to Never
- If working remotely, you will need to connect to the VPN using the Cisco Secure VPN client
Accessing your old personal share
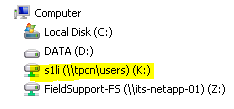
4. Once connected to the VPN, open a Windows Explorer window and look for your personal share on the left side of the window, under Computer
note: If you are on a Mac, you will need to connect to your personal share manually.
- If you do not see your personal share, you can navigate to it manually:
- Windows:
- Press the WINDOWS + R keys together to open a Run window
- Type or paste in the address corresponding to your organization, and press enter:
- Advancement: \\TPCN\Users\<your AD user name>
- Business and Finance: \\BFS-FILE\Users\<your AD user name>
- Human Resources: \\HR-FILE2\Users\<your AD user name>
- EVC/RMP: Please contact Field Support if you require assistance
- MacOS:
- Press the COMMAND + K keys together to open a Connect to Server window
- Type or paste in the address corresponding to your organization, and press enter:
- ADV:: smb://<your AD user name>:*@tpcn.ucsd.edu/users/<your AD user name>
- BFS: smb://<your AD user name>:*@bfs-file.ucsd.edu/users/<your AD user name>
- HR: smb://<your AD user name>:*@hr-file.ucsd.edu/users/<your AD user name>
- EVC/RMP: Please contact Field Support if you require assistance
- Enter the password for your AD account to mount the personal share as a network drive
- Windows:
- Take note of anything you wish to migrate into OneDrive for future retention
Logging into OneDrive
- Open a browser window and navigate to https://onedrive.ucsd.edu
- Log in using your @ucsd.edu credentials (the same one you use to log into email)
- If prompted, select your Work/Organization account
- You should now be able to see your OneDrive storage space
Migrate files/folders to OneDrive
You can migrate files and folders to OneDrive using your internet browser.
PLEASE NOTE: Migration using both methods will replace the "Modified" date of your files/folders with the date of the migration. If you need to retain this information, please submit a Case using this form.
Internet Browser
- To migrate files and folders into OneDrive, simply drag-and-drop items from your Windows Explorer window into the OneDrive browser window.
- As the files are uploaded, you should see this status box appear in OneDrive. You can click on this status box to show a progress bar during the migration process:
- If the migration was successful, you should see a confirmation box appear showing how many files were moved and where, in this example they are now in the Attachments folder:
- If your migration is not 50% complete after 2 hours, please submit a Case for personal shares migration assistance using this form.
Finishing up
- After you have migrated everything needed from your personal share, you can disconnect from VPN
- Your personal share will remain read-only for a period of time after the initial cutover date so you can go back and copy things out of it later
- We highly encourage using the web version of OneDrive wherever possible
What about the OneDrive sync client application for Windows and MacOS?
Please refer to KB0033121 for ITS current recommendations regarding the OneDrive sync client application for Windows and MacOS.
If you still have questions or need additional assistance, please submit a Case for personal shares migration assistance using this form.