Overview
Learn how to allow assistants to schedule meetings in Zoom on behalf of someone else.
Critical Concepts
Note: Both you and the assigned scheduler (assistant) must have a Pro license. All UCSD staff, student, and faculty currently have Zoom Pro due to COVID-19. If you see your account reflect "Basic," please contact the ITS Service Desk to get your account upgraded to Pro. A Pro license will show up as "Licensed" in your Zoom profile.
Scheduling privilege is designed so:
- You can assign a Pro user or multiple Pro users with UCSD Single Sign-On (SSO) credentials to schedule meetings on your behalf.
- You can also schedule meetings on behalf of a user (or multiple users) that has assigned you scheduling privilege.
- Users with scheduling privilege on your account will be able to manage and act as an alternative host for all meetings.
Steps to Take
Give scheduling privilege to someone else
- Login to your Meeting Settings.
- Under Other, click the + next to Assign scheduling privilege to.
- Type in the email address of the assigned scheduler(s). Use commas to separate multiple email addresses.
- Click Assign.
If the user was assigned successfully, they will appear under Assign Scheduling Privilege to. However, they will need to sign out of the Zoom desktop client and sign in again before they will be able to schedule for you there. If scheduling privilege cannot be assigned because the user is not on your account or is not a Licensed user, you will receive an error message: "Can't find user [their email]"
Schedule a meeting for someone else
Mac, Windows, Linux
The user given scheduling privilege will need to logout of the Zoom client and login again for the scheduling privilege option to appear.
- Sign in to the Zoom Desktop Client.
- Click on the Schedule icon.
This will open the scheduler window. - Find the Schedule for section, found below the Topic section, and choose the user you want to Schedule For from the dropdown menu.
- Click Schedule to finish, and open up the calendar you have selected.
Web
- Sign in to the Zoom web portal.
- Click Meetings, then click Schedule A Meeting.
- Find the Schedule for section, found below the Registration option, and choose the user you want to Schedule For from the dropdown menu.
- Click Save to finish.
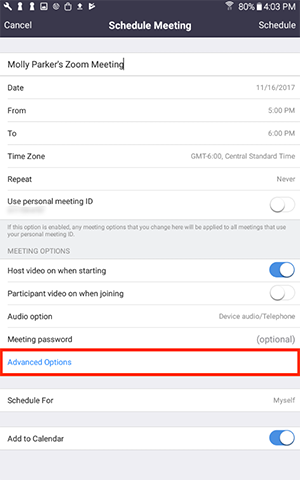
Android
The user given scheduling privilege will need to logout of the Zoom client and login again for the scheduling privilege option to appear.
- Sign in to the Zoom mobile app.
- Tap Schedule.

- Tap Advanced Options.
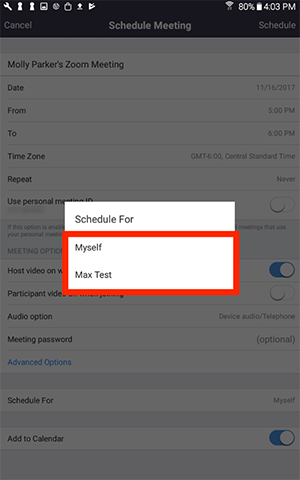
- Tap the name of the user you want to schedule the meeting for.
- Tap Schedule to finish scheduling.
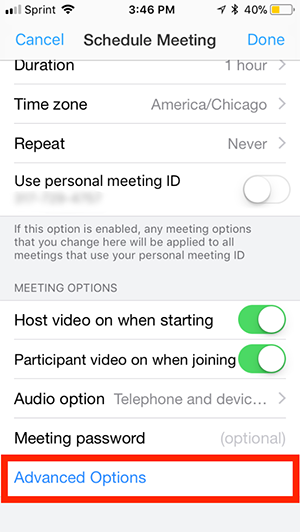
iOS
The user given scheduling privilege will need to logout of the Zoom client and login again for the scheduling privilege option to appear.
- Sign in to the Zoom Mobile App.
- Tap Schedule.
- Tap Advanced Options.
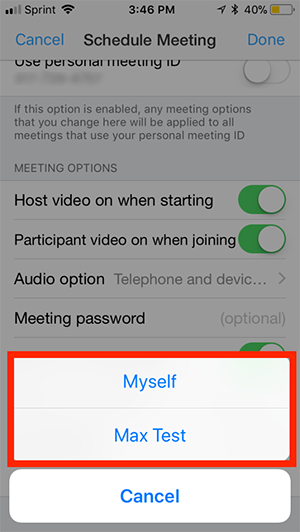
- Tap Scheduling Privilege.
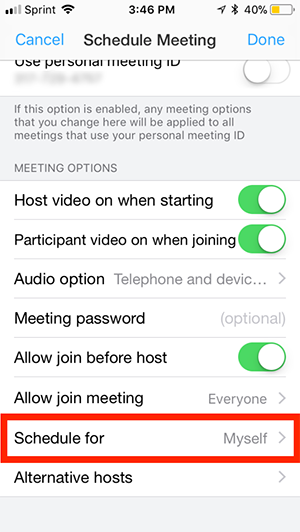
- Tap the name of the user you want to schedule for.
- Tap Done to finish scheduling.
If you still have questions or need additional assistance, please contact us at zoom@ucsd.edu or submit a Zoom Request Form.